Approach to Post-Processing Landscape Photography

For some, a controversial topic, while for others, one of the most important steps in the photography process.
Post-processing is a critical step in the workflow of a landscape photographer. It allows you to fine-tune the exposure, color balance, sharpness, and other details of your images to make them look their best. The goal of post-processing is to bring out the full potential of your photos and to create images that accurately represent the scene as you saw it or to create a specific look or style.
There are many different post-processing techniques and tools available, ranging from basic adjustments in software like Adobe Lightroom to more advanced techniques like tone mapping, selective adjustments, and compositing. Some of the most common post-processing tasks include adjusting exposure, contrast, and white balance, removing noise, sharpening the image, and removing distracting elements.
As with any aspect of photography, it's a good idea to develop your own style and approach to post-processing and to learn from other photographers and their work.
An important aspect of post-processing that is sometimes overlooked is understanding the file formats you shoot in. To me, and many others, shooting in RAW is absolutely crucial. But what is RAW? A RAW file is a digital image file format that contains unprocessed, raw image data captured by a digital camera's image sensor. Unlike JPEG files, which are compressed and have had some of their data processed by the camera, RAW files preserve all the original data captured by the sensor, including details like exposure, color balance, and other settings.
RAW files are sometimes referred to as "digital negatives" because they have not been processed or manipulated in any way, just like a film negative. This allows for greater flexibility in post-processing, as the photographer has more control over the final look of the image.
Cameras shoot in RAW format because it provides a higher quality and more flexible starting point for post-processing. RAW files offer more detail, dynamic range, and color information than JPEGs, allowing photographers to make adjustments to exposure, white balance, and other settings without losing image quality.
As there are so many different styles of photography and stylistic choices that can be made, I will be sticking to how I personally choose to process my images. It’s important to mention that you should approach each and every image differently as every image has its own "problems" that need to be addressed and solved. There is no "One Size Fits All" option when it comes to post-processing. Yes, we may find ourselves adjusting the same sliders or cropping the same based on our personal preferences, but it’s important to start each processing session by taking a step back and asking yourself, "What does this photograph need?" "What do I love about it?" "What do I not like about it?" "Does anything distract me?"
Just by asking these questions, you will be surprised by how quickly you start to think of ways you would like to approach the image, and it will help to demystify post-processing as you will quickly realize it may be simpler than you think.
I can easily ramble on and on about the do's and don'ts and different avenues you can take, so to keep the information simple and easy to follow along, I am going to approach the information in ten steps.
Step 1:Getting it right in camera
Step 2:Basic Global Adjustments
Step 3:Local Adjustments
Step 4:Blending and Stacking Images
Step 5:Remove Distracting Elements
Step 6:Dodging and Burning
Step 7:Final Global Adjustments
Step 8:Sharpening
Step 9:Take a Break
Step 10:Saving and Exporting
Step 1: Getting It Right In Camera
Getting it right in camera means capturing a photo or video with the correct exposure, composition, and other settings so that minimal post-processing is needed. This refers to the idea that the image should be captured as close as possible to the desired final result in-camera, rather than relying heavily on editing software to correct errors or improve the image.
Additionally, taking a picture with post-processing in mind means considering how the image will be edited or manipulated in post-production before taking the shot. This approach takes into account factors such as lighting, color balance, and composition, with the understanding that adjustments may be made in post-production to achieve the desired final result. By considering post-processing, a photographer can make deliberate decisions about the way the image is captured to ensure that the final result is more easily achieved through editing.
Depending on a number of factors, a scene may potentially need focus stacking and exposure bracketing in order to properly and successfully capture the entire scene in focus and to preserve all of the information in the highlights and shadows if the dynamic range of the scene is too large to capture within a single shot. As some of these topics can be explained completely on their own, I will only give a brief explanation of them.
Focus Stacking:
Focus stacking is a technique used in landscape photography to increase the depth of field (DOF) of an image. This is done by taking multiple photos of the same scene, each with a different focus point, and then combining the images in post-processing to create a final image with a greater DOF.
In landscape photography, it is often desired to have a large DOF that keeps both the foreground and background in focus. However, due to the limited aperture of most lenses and phenomena like diffraction, this is not always possible with a single shot. Focus stacking solves this problem by allowing the photographer to capture multiple images with different focus points and then blend them together to create a final image with a greater DOF. This results in a photo that is sharp from foreground to background.
Focus stacking is particularly useful in macro photography and landscape photography where a large DOF is often desired to keep both close and distant objects in focus.
Exposure Blending:
Exposure blending is a technique used in landscape photography to combine multiple images taken at different exposures into a final image with a greater dynamic range. This is done to capture both the highlights and shadows in a scene that may be too bright or too dark for a single exposure to handle.
In landscape photography, scenes often contain both bright highlights (such as the sky) and dark shadows (such as in a forest or under a cliff). Capturing both the highlights and shadows in a single exposure can be challenging, as the camera's dynamic range is limited. To overcome this, photographers take multiple exposures of the same scene, each at different exposures, and then blend them together in post-production to create a final image with a greater dynamic range. This allows the photographer to retain detail in both the bright highlights and dark shadows, resulting in a more balanced and natural-looking image.
Exposure blending is particularly useful in landscape photography where a high dynamic range is often desired to capture the full range of light and color in a scene.
Additionally, one should consider "shooting with post-processing in mind." For some photographers, focus stacking or exposure blending may actually be more of an artistic approach rather than a technical one. For me personally, so much of the look and feel of my images comes down to the fact that I shoot and edit my shots in a very particular way, which includes the use of focus stacking and exposure blending. Whether it is a technical choice or a creative choice, I think it's an important skill to carry in your back pocket as you never know when a scene may call for a specific technique.
Step 2: Basic Global Adjustment
Once it finally comes time to begin the editing process, I like to start with basic global adjustments. For people not familiar with the terms "global" and "local" adjustments, let's begin by explaining these terms.
In post-processing, "global adjustments" refer to changes made to an entire image, affecting its overall look and feel. On the other hand, "local adjustments" refer to changes made to specific parts of an image, such as dodging and burning, selective color correction, and selective exposure adjustments. The idea is to make adjustments that are specific to a certain area or subject within the image, rather than affecting the whole image uniformly. Local adjustments tend to be made with some sort of masking, whether that be linear, radial, or brush masks inside programs like Adobe Lightroom or more technical masking techniques in Adobe Photoshop.
Returning to global adjustments, there are a few basic steps we can take to bring the image closer to what we saw out in the field. Landscape photographers often lower the highlights and raise the shadows in their images to better preserve the details in both the bright and dark areas of the scene. High dynamic range scenes, like many landscape images, contain a wide range of tonal values from bright highlights to deep shadows. When highlights are overexposed, the bright areas of the image can become washed out and lose detail. Similarly, when shadows are underexposed, the dark areas can become too dark, also losing detail.
By lowering the highlights and raising the shadows in post-processing, the photographer can recover some of the lost detail in both the bright and dark areas, creating a more balanced and visually appealing image. This technique helps to create a final image that better represents the scene as it was experienced, with a more natural distribution of tonal values.

Step 3: Local adjustments
Often times, I find that beginner photographers attempt to process their images using only global adjustments and yet feel like they are "missing something." More often than not, what they are missing is local adjustments. We will often run into problems when we only use global processing as certain areas of the images may need very tailored processing. I often find myself adjusting things like the shadows under bushes or the saturation of a specific area. I will personally argue that local adjustments are far more powerful and useful than global adjustments. Rather than getting too specific here, approaching local adjustment can be as simple as taking a step back from the photograph and trying to address very specific things you see in very specific areas. "This area is too dark." "This area is much brighter than the rest and is distracting." "The color in this area is too much." "This area needs more contrast." You can also add effects to certain areas like negative clarity or negative dehaze to add an implied feeling of atmosphere.

The red mask is a local adjustment that only affects the area it was brushed over.
Step 4:Blending and Stacking Images
Once we are happy with our basic adjustments to the image, the next possible step may be blending and stacking multiple images and exposures. It's important to mention that this step may be skipped entirely as not every image requires focus stacking or exposure blending. As mentioned earlier, this can be an artistic choice, but occasionally, we find that it is technically required for us to use one or multiple of these methods. As we briefly touched on why we may want to focus stack and/or exposure blend earlier in Step One, I will instead touch on how we can achieve the two techniques.
In both of these techniques, an important first step is aligning all of the images we plan on blending. Even on a sturdy tripod, you will notice some discrepancy between all of the frames. This can be due to the tripod shifting ever so slightly on an uneven or soft surface or even just lens breathing. Lens breathing, also known as focal length shifting, is a phenomenon in photography where the effective focal length of a lens changes as the focus is adjusted. As a result of this effect, the angle of view and the apparent subject size can shift as the focus is changed. To address all of these issues, we will need to align all of the images we plan on stacking. To do so, select all of the images in the layer section, hover over the edit tab at the top of Photoshop, and select "Auto-Align Layers" from the drop-down menu. Make sure "Auto" is selected and press OK. Once Photoshop is done loading and processing the layers, you can toggle the individual layers on and off to see if it did a good job at aligning them. You will often find that in order to properly align the layers, Photoshop has slightly moved around certain layers and may leave a blank edge around the layers. The easiest way around this is to just crop in slightly to remove the blank areas. This crop is subtle enough to not lose a substantial amount of your photo or to change or affect your composition. Once the layers are aligned, we can either focus stack, blend exposures, or both. We will talk about focus stacking first.

Auto-Align in Photoshop.
Focus Stacking:
Once your images are aligned, we have two options for focus stacking our layers: Auto Blending or Manual Blending.
For Auto Blending, select all of the images you would like to stack, hover over the "Edit" tab at the top of Photoshop, and select "Auto-Blend Layers" from the drop-down menu. Select "Stack Images" and "Seamless Tones and Colors," then press OK. This may take a moment, but once Photoshop is done loading, it should have chosen the sharpest pixels from each layer and blended each layer using a series of masks. It's important to mention that the effectiveness of this process is based on how still subjects in your image are. If there is too much movement, like wildflowers moving in the wind, it can sometimes be almost impossible to properly focus stack, manually or automatically. This is where I would highlight "Getting it right in Camera" and "taking a picture with post-processing in mind." You need to consider these things out in the field while you are shooting so you don't come home to a bunch of images that you unfortunately cannot focus stack or blend.

Auto-Blend Layers inside of Photoshop
Alternatively, we can manually blend the layers using masks. The layers must first be "Auto Aligned." Once this is done, we can add a layer mask to each layer and, using a white paint brush, brush in areas we want to reveal and use black to conceal areas. Masking is not very complex, but for the sake of this blog, we will not be going into depth here. Manual blending is best for very simple scenes with little to no movement.
Exposure Blending:
Similar to Focus Stacking, it is important that we properly align the images we intend to blend first. Once we have aligned them, we can move on to blending the images
Luminosity Masks:
Luminosity masks are a powerful technique in Photoshop used for selective editing and adjustment based on the luminance values of an image. Instead of selecting areas based on color or specific objects, luminosity masks allow you to create selections based on the brightness levels of the pixels.
A luminosity mask is essentially a grayscale image where different tones correspond to different levels of selections and masking. The brighter areas of the luminosity mask represent white and tend to "reveal", while the darker areas represent black and "conceal". By creating and using luminosity masks, you can target specific tonal ranges and apply adjustments or effects selectively to those areas. If this is your first time hearing about luminosity masks, there is only so much I can tell you in this blog, so I encourage you to watch videos and experiment with them. I highly recommend getting a luminosity mask plugin. There are many great options available on the market, both free and paid.

A brief look at Luminosity Masks using Raya Pro + InstaMask Panels created by Jimmy McIntyre.
Manual Masking:
Manual masking is exactly what it sounds like, we manually mask in the layers we want. By using the "white to reveal and black to conceal" method, we can paint certain pixels of specific layers over other layers using masking. I personally prefer manual masking for exposure blending when the blend is straightforward and uncomplicated.
Manual masking allows us to have precise control over the blending process, ensuring that the desired elements from different exposures are seamlessly combined. It's a technique that requires attention to detail and patience, as we carefully paint in the areas we want to reveal or hide. By using a brush and adjusting the opacity and flow, we can gradually build up the blend to achieve the desired effect. Manual masking is particularly useful when the subject and the blend edges are well-defined, making it easier to create smooth and natural transitions between different layers.
While manual masking can be time-consuming, the level of control it offers makes it a valuable tool in our editing workflow. With practice, it becomes an intuitive process, allowing us to create visually stunning landscape images with precise exposure blending.
Select Sky:
Often, if the horizon line of an image is sharp and crisp enough, we can achieve excellent results by utilizing Photoshop's "Select Sky" feature and mask in our exposure blend with ease. Lately, I've been increasingly relying on this option and employing more advanced methods like luminosity masks to refine the final result, while still letting "Select Sky" handle the heavy lifting. To access this feature, simply hover over the "Select" tab in Photoshop and locate "Sky". After a brief calculation, Photoshop will select the sky for you. In the layers section, choose the sky layer and add a mask, which Photoshop will automatically create. In most cases, the initial result is quite accurate, but occasionally some refinement may be necessary using luminosity masks or manual brushing. It's important to note that our sky layers are typically darker than the main exposure to preserve highlight details, and the landscape portion of the sky exposure is often relatively dark. If "Select Sky" doesn't produce a perfect sky selection, there may be some dark banding and edges when blending the sky over the main image. To address this, adjust the shadows of the sky layer slightly more than usual to facilitate a smoother transition.
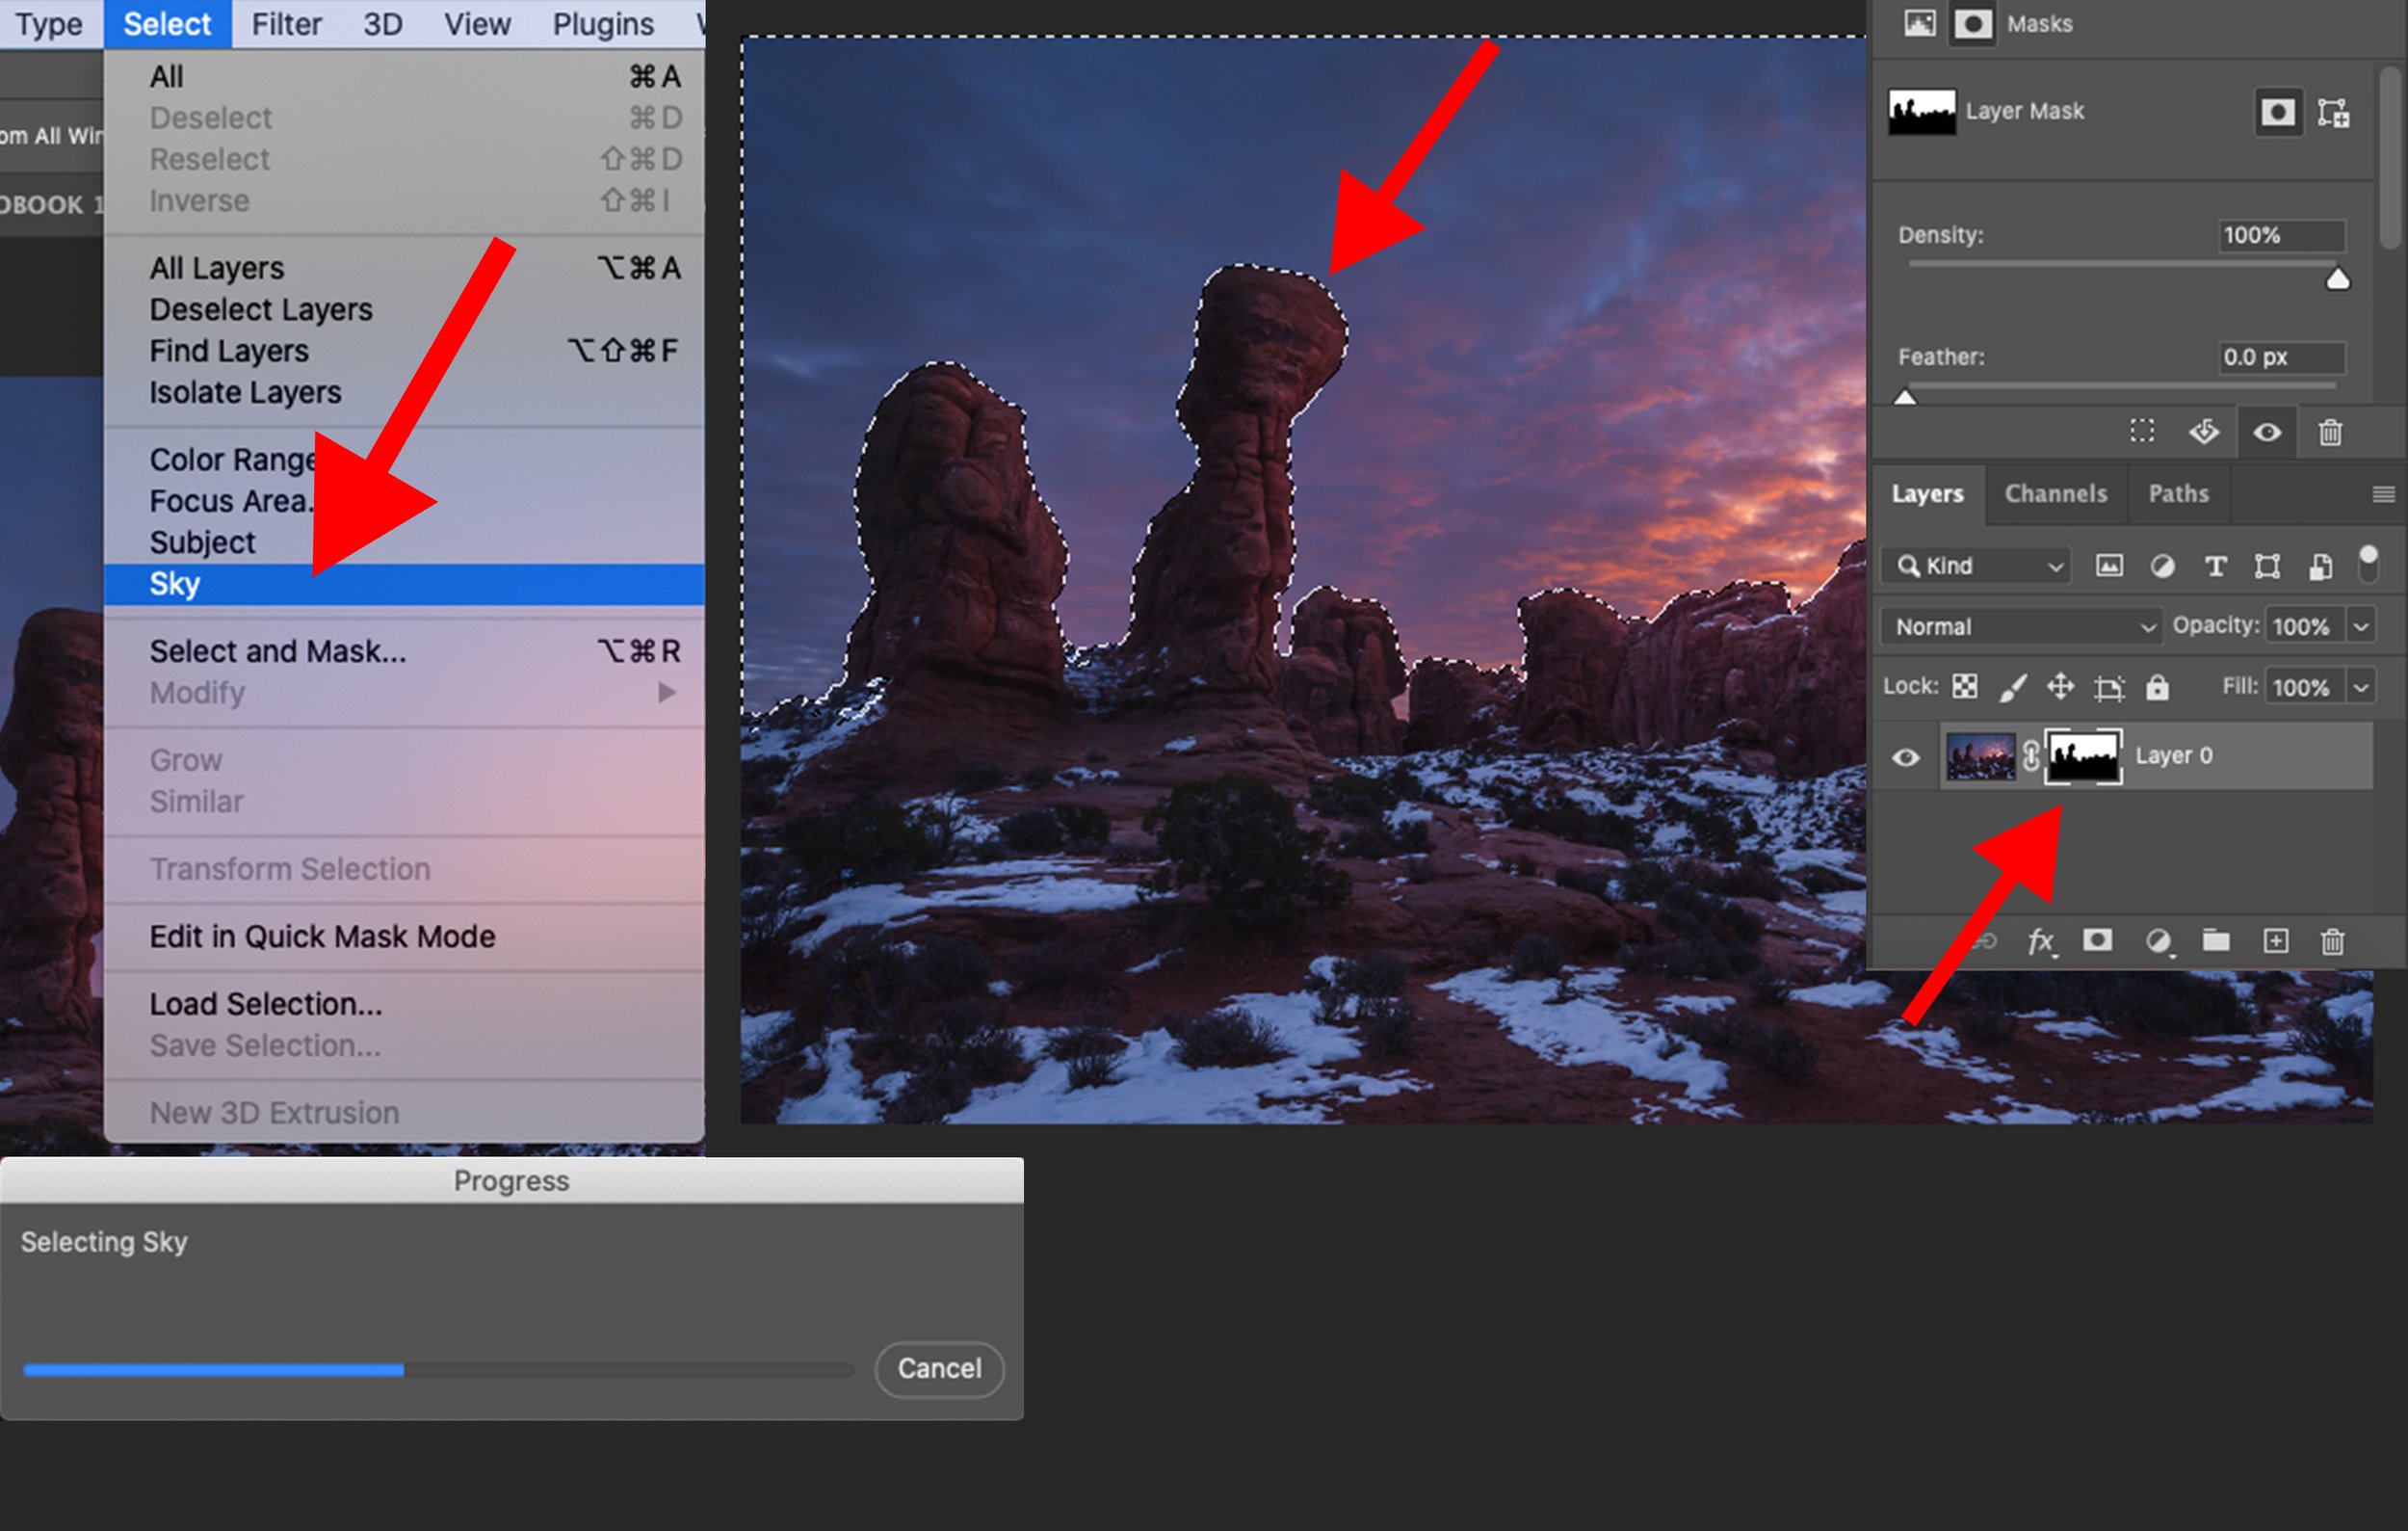
Select Sky feature within Photoshop.
Dual processing:
Even though I consider dual processing a more advanced for of local adjustments, I’ve chosen to add the section here as I don’t use this technique until I’ve reach this point in the process. Dual processing is a far more advanced method of local processing but once mastered, it opens the doors to far more powerful processing.
Dual processing in landscape photography refers to the practice of processing a single image twice, with each processing session producing a different result. For example, one processing session may be used to bring out the details in the highlights, while the other is used to recover detail in the shadows but the sky is really the limit here. The two resulting images are then blended together using masks, to produce a final image that combines the best aspects of both.
Step 5: Remove Distracting Elements
To me personally, this is arguably one of the most important steps in the process. It may seem like such a simple and inconspicuous step within the process of editing a photograph, but when comparing a before and after of this step you really start to get an idea of just how powerful it can be.
There are three main tools I like to use to achieve this, the healing brush, the content aware fill tool, and clone stamping. Most of the time I like to use the healing brush as most of the distraction I like to clean up are small little pieces of debris throughout the photo or small sensor dust spots. The healing brush makes extremely easy and quick work of those type of things. If I ever have areas slightly large or more complicated, I like to use the content aware fill tool. Simply make a selection around the area you would like to fix, then hover over “Edit” and select “Content Aware Fill”. Most of the time content aware fill does a great shot but occasionally it may need some adjusting and tweaking. Lastly, you can use the clone stamp tool. I personally use this tool the last but it is still quite effective. It essentially copies one are that you choose and then pasted that over another area you choose.

Before and After showing some of the distracting elements on the left and a cleaned up version on the right. At this scale, it may be hard to see the changes, but the debris to the right of the foreground rock is quite noticeable.
Step 6: Dodging and Burning
Dodging and burning were originally techniques used in darkroom printing to selectively lighten or darken specific areas of a photograph in the days of film. Today, these techniques can be used to selectively add contrast and light or to imply and exaggerates the presence of light and dark.
Dodging:
My personal favorite way to approach dodging is by painting with light selected from the scene (Cmd/Ctrl I) and brushing it in using the brush tool. You can either paint with pure white or use the color of the light source within your scene (e.g., for a sunset scene, I may sample a bright golden tone from the image's bright part). It is important to use the correct blending mode to achieve the desired effect. I primarily use Overlay, but occasionally opt for Soft Light for a more subtle touch. You can then "paint" over areas that already have highlights to enhance the light or paint over areas that lack highlights to create the impression of light hitting those areas. When painting in the impression of light, it is important to think logically. Consider if there are any objects blocking the existing light in the scene and adjust accordingly. While artistic freedom allows for occasional rule-breaking, it's essential to be mindful as the human eye is adept at detecting inconsistencies.
Alternatively, you can add a Brightness adjustment and mask in the areas where you want to enhance brightness.
Burning:
For burning, I typically paint with pure black using the Overlay blending mode. Similar to dodging but in reverse, I darken areas that are already dark or areas that would realistically have shadows.
Another approach to burning that I apply to most of my images is a technique I call "manual vignetting." The human eye is naturally drawn to areas of light or brightness. With this in mind, we can intentionally darken certain areas to divert attention away from them. This should be done subtly, but it can be a powerful and effective way to guide the viewer's focus.
As a final tip for dodging and burning, I like to start with the opacity of my dodging and burning layers set to zero and gradually increase it until I am satisfied with the results. This allows for fine-tuning and ensures the adjustments blend seamlessly with the rest of the image.

A simple example of an image with dodging and burning applied to it. Some dodging is visible on the green moss on some of the rocks.
Step 7:Final Global Adjustments
At this point in the process, it is likely that you have been staring at your image for quite some time, meticulously fine-tuning every subtle detail. However, in doing so, there is a chance you may have lost sight of the "bigger picture." It's important to take a step back and reassess the overall impact and visual harmony of your photograph.
During this stage, I often find that making some final adjustments to contrast, saturation, or brightness can bring the image closer to its desired final outcome. These adjustments help to enhance the overall visual impact and make the photograph more captivating to the viewer. You can experiment with increasing contrast to make the colors pop and the details stand out, adjusting saturation to achieve the desired level of vibrancy, or fine-tuning the brightness to ensure the optimal tonal balance.
Remember, the goal is not to drastically alter the image or distort its original essence, but rather to refine and enhance its visual appeal. Pay attention to how these adjustments interact with the various elements within the frame and make subtle tweaks until you achieve the desired outcome. It's always beneficial to take breaks during the editing process and revisit the image with fresh eyes to ensure you're making informed decisions that align with your creative vision.
By adding these final adjustments, you bring the photograph one step closer to its ultimate potential, ensuring that it reflects your artistic intention and captures the essence of the scene you initially envisioned.

Every image is different, but this particular image had some contrast adjustments made, changes to the colors and saturation, simple light painting from the left, and a subtle amount of Orton Glow.
Step 8:Sharpening
The final step in my editing process is sharpening. Sharpening is a crucial technique that enhances the overall detail and clarity of a photograph, bringing out the textures and patterns present in the scene. By applying sharpening, we can make the image appear more focused and defined, allowing the subject to stand out and creating a visually captivating and engaging photo.
It's important to note that sharpening cannot salvage a completely out-of-focus image, which brings us back to the importance of getting the shot right in camera from the very beginning. Previously, I used to believe that sharpening was a magical step that could turn a poorly captured photo into a masterpiece, but I soon learned that this notion was far from the truth. Sharpening is an enhancement tool that works with the existing details in the image. If the photo is sharp and well-focused to begin with, sharpening will bring out those details even more. On the other hand, if the photo is originally out of focus, sharpening will only enhance the blurriness.
My personal go-to method for sharpening involves creating a merge visible layer. To do this, I select all the layers in the layers panel, right-click on any layer, and while holding down the "Shift+Cmd+Alt" or "Shift+Ctrl+Alt" keys, I click on "Merge Visible." It's important to hold down these keys; otherwise, Photoshop will merge all the layers into a single layer, which we want to avoid. By creating the merge visible layer, I can retain the original layers and have the merged layer at the top of the layer stack.
Once the merge visible layer is selected, I hover over the "Filters" tab in Photoshop and choose "Highpass." In my experience, a value of 1.0 works well for most of my photographs. Once the Highpass effect is applied, the screen may turn grey, but there's no need to worry. Simply change the blend mode of the layer to either "Soft Light" or "Vivid Light." Personally, I prefer using the "Vivid Light" blend mode.
Sharpening is a subtle yet powerful technique that adds that extra touch of crispness and definition to your images. It's important to use it judiciously, considering the intended look and feel of the photo. Remember, sharpening should enhance the existing details, not overpower or create artificial effects. By mastering the art of sharpening, you can bring your photographs to life, revealing the intricate details that make them truly captivating.

High Pass Sharpening inside of Photoshop.
Step 9:Take a break
At this point, you should be looking at your finished masterpiece! However, instead of stopping here, I believe there is one more extremely important step. As artists, we often become too emotionally invested in our work, and while that is okay, it can lead us to become blind to the flaws in our own creations.
One of the most valuable skills we, as artists, should adopt is the ability to take a step away from our work, giving our senses a much needed break. Whether it's taking a short break to use the restroom or reaching a stopping point for the day, you will be amazed by the "flaws" you notice when you return with fresh eyes. Often, you may realize that the image is darker than you originally thought or that the contrast is too intense. These small details are what make the photo a final product, but without giving our eyes a break, we may not notice them.
In essence, the rule of thumb here is that when you think you are done, take a step away and come back later to truly finish it. By doing so, you give yourself the opportunity to view your work with a renewed perspective and spot any adjustments or refinements that are necessary for achieving the desired outcome. So, take that break, refresh your mind, and return to your artwork with a critical eye to make it the best it can be.
Step 10:Saving and Exporting
One of the final yet most important steps in the post-processing workflow is saving and exporting your images. Unfortunately, this step often gets overlooked or rushed through by many photographers. However, taking the time to properly save and export your images can make a big difference in how they look online or in print.
First, it's important to organize your images and create a system for saving and exporting them. As a landscape photographer, you likely have many images to manage, so it's important to have a consistent and efficient system in place. One approach is to create a folder on your computer or external hard drive called "Portfolio," and within that folder, create subfolders named after each photo. This way, you can easily locate and access specific images as needed.
When it comes to saving and exporting your images, it's a good idea to create at least three different versions of each image. The first version should be a Photoshop file (.PSD) that includes all of your layers and adjustments. This allows you to go back and make changes to the edit if you ever want to without having to start over from scratch. The second version should be a high-quality JPEG file that is ready to use for online sharing or printing. This file should be saved with a descriptive or creative name such as "Morning’s First Light.jpg". The third version should also be a high-quality JPEG file, but with your logo or watermark added to it. This version is important for branding and protecting your images from unauthorized use.
In summary, don't overlook the importance of saving and exporting your landscape photography images. Develop a consistent and efficient system for organizing and managing your images, and create at least three versions of each image, including a Photoshop file, a high-quality JPEG, and a JPEG with your logo or watermark. Take the time to choose the appropriate settings when exporting your images for the intended use, and you'll be able to showcase your work in the best possible way.

A simple look at my main 'portfolio' folder with all of the folders named after my images and the contents of each folder.
Conclusion:
In conclusion, this blog post has covered a comprehensive guide on post-processing landscape photography. By following the steps outlined below, you can enhance your landscape images and bring out their full potential. Remember, post-processing is a creative process that allows you to express your vision and style, so feel free to experiment and develop your unique editing techniques. With practice and experience, you'll continue to refine your skills and produce remarkable landscape images that captivate viewers and tell compelling visual stories. Happy editing!